Your Cart is Empty


Empty the drawer, toss anything broken or duplicate, then coil each cable into a closed loop secured with a binder clip or Velcro strap. Drop those bundles into small containers grouped by type, label everything, and put it back. Most drawers take 10 to 30 minutes from start to finish, and because each cord is locked into its own loop, it stays untangled long after the “after” photo
TL;DR:
- Lock each cable into a loose coil using binder clips or Velcro straps to prevent them from unraveling and re-tangling over time.
- Label storage containers clearly with device type, cable length, and category, using labels inside bags or stickers for quick identification.
- Use small plastic boxes, freezer bags, or DIY cardboard tubes to organize different cable types, keeping frequently used items at the front for easy access.
- Measure drawer dimensions before purchasing organizers to ensure accurate fit, and layer or stack cords vertically with rigid inserts to maximize space.
- Regularly scan and purge the drawer every few months to remove obsolete or damaged cords, maintaining a tidy and functional cable storage system.
If you want results before your coffee gets cold, these five methods cover almost every cord you own. Rank them by how often you grab the cable, not by how fancy the container looks.
Skip the fancy divided trays that only separate cables without securing them. A container that doesn’t close the loop still lets loose ends wander and knot with whatever’s next to it. The container matters less than whether the coil itself is locked shut.
You don’t need a weekend for this. Set aside 30 to 45 minutes, put on a podcast, and work through these six steps in order.
Pro Tip: Leave a few inches of slack in each loop before you clip it. A coil pulled too tight puts stress on the connector where it meets the cable, which is the first place cords fail.
Not every cord needs the same container, and buying one expensive tray for everything usually wastes money and drawer space. Match the material to the cable.
Leave a little slack in every container, roughly a hand’s width of loose cable, so the plug end isn’t under tension every time the drawer opens and closes, following ergonomic tips for continuing to work from home to reduce strain and cable stress.
A label should tell you three things at a glance: the device it charges, the cable type (USB-C, Lightning, micro-USB), and, if you keep multiple lengths, how long it is. Write it where you’ll actually see it, on the bag itself, a strip of tape on the clip, or a printed sticker from a label maker.
Color-coding by device family (all Apple cables in blue tape, all Android in green, for instance) lets you scan the drawer instead of reading every label. Set a recurring reminder to do a quick scan every few months and a full purge once a year, since regular audits are what keep a drawer from sliding back into chaos. Pull anything with a connector you no longer own a device for, and any cable with exposed wiring or a cracked jacket.
Pro Tip: Keep power bricks and anything that generates heat separated from the rest of the drawer, and never store batteries or damp items alongside your cables. Good labeling can cut retrieval time to a few seconds, but only if the drawer itself stays dry and dust-free.
Coil each cable loosely, in a circle roughly the size of your palm, rather than folding it in half. A tight fold at the plug base is where internal wiring cracks first, and avoiding sharp bends at the connector is one of the simplest ways to extend a cable’s life.
Locking the loop matters more than the coil itself. An unclipped bundle still lets its ends drift into the next cord over, undoing your work within days. Dust and grit are the quiet enemy here too; wipe the drawer out when you do your seasonal audit, and keep anything sharp, like a stray key or pen, out of the same space. For bulky power bricks that won’t coil at all, stand them upright in their own compartment rather than forcing them to lie flat under other cords.
Your phone charger and laptop cord don’t belong buried under HDMI cables you touch twice a year. Reserve the front section of the drawer, or the top layer if you’re stacking, for anything you plug in daily.
A Velcro strap beats a binder clip here, since you’ll be opening and reclosing that loop constantly, and a clip’s metal tab wears out faster with daily use. Keep these frequent cables loose enough to grab with one hand; a snug bag you have to unzip every morning adds friction you don’t need. If you charge devices at a desk, consider keeping one “active” cable outside the drawer entirely, clipped to the desk edge or looped over a hook, and reserve the drawer for backups and less-used cords.
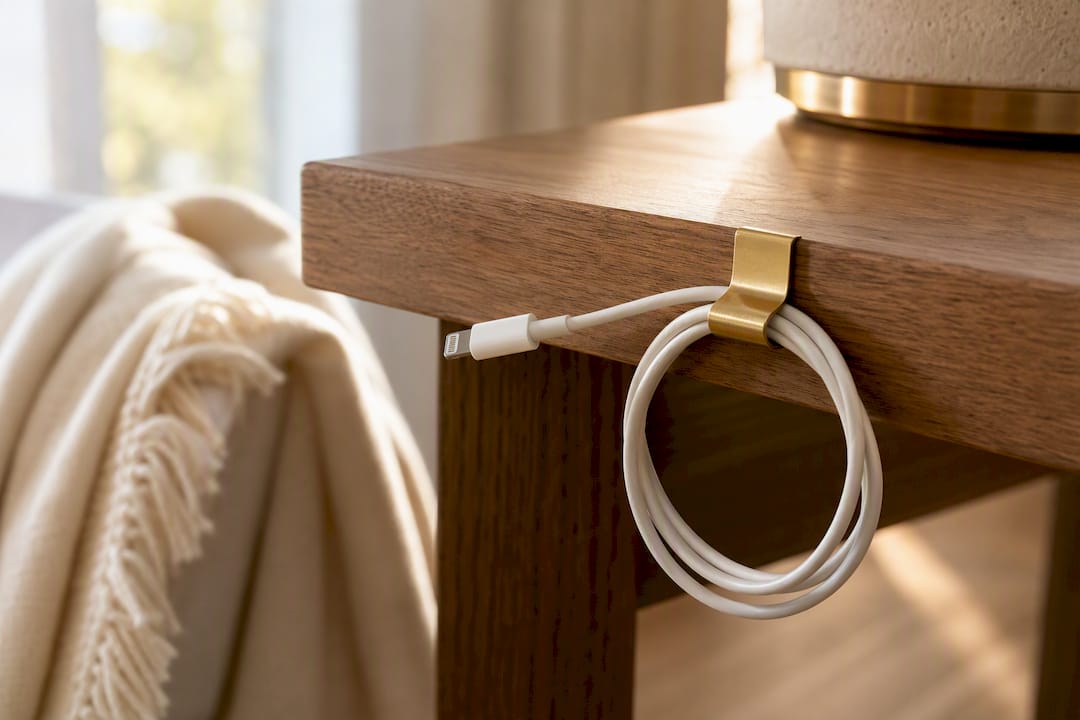
This is also where color-coding pays off fastest. If your daily driver cable has a bright strip of tape while everything else is neutral, you’ll spot it without reading a single label. Position frequently used items where the drawer opens widest, typically the front third, and keep the back reserved for cords you might need once a quarter. A tidy drawer only stays tidy if the cables you touch most are also the easiest to reach, so don’t apply the exact same storage rules everywhere.
Most cable drawers aren’t deep, which means vertical space is your biggest untapped resource. Standing cables on end, either in cut cardboard tubes or narrow compartment boxes, lets you fit two or three times as many cords as laying them flat ever would.
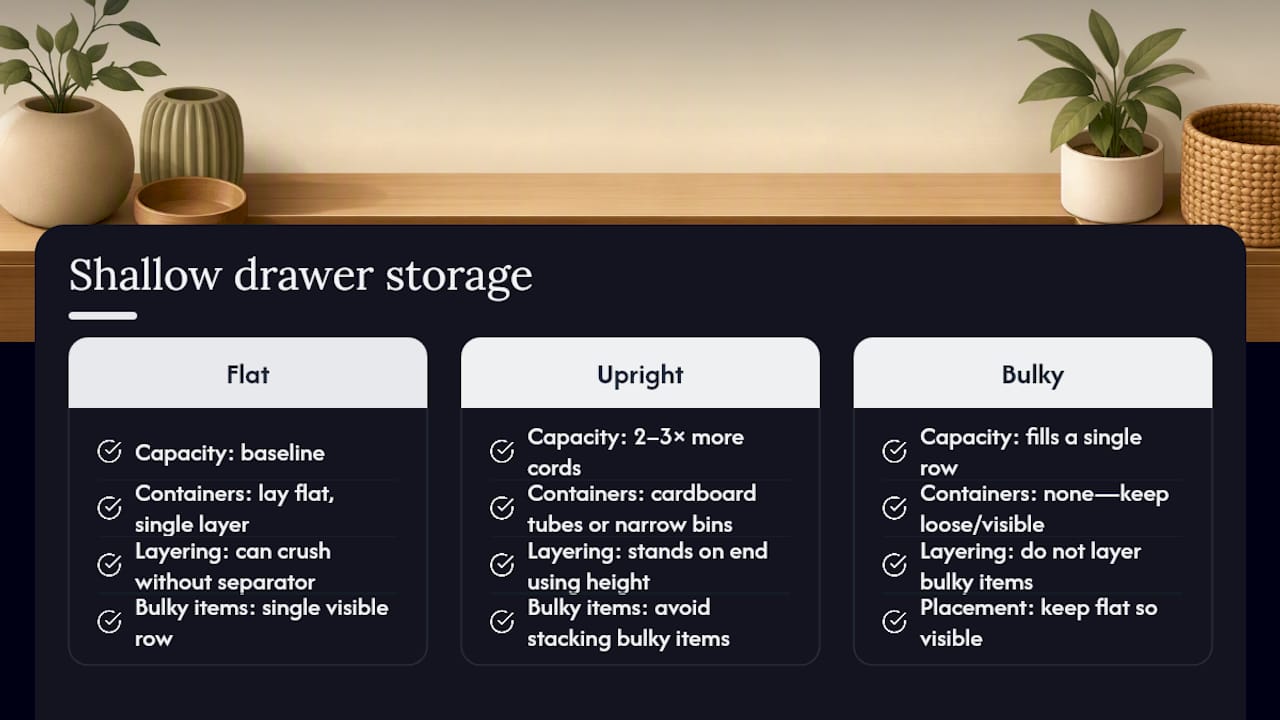
Layering works too, but only if you separate layers with something rigid. A thin tray or a piece of cut foam on top of your first layer of bundled cords keeps a second layer from crushing the ones below and pulling their loops loose. Skip layering entirely for anything bulky, power bricks and thick adapters should stay in a single flat row where you can see them.
Before buying any stacking tray or insert, measure the drawer’s interior dimensions, including any hardware like slides or a center guide that eats into usable space. A tray that’s a half inch too tall will jam the drawer every time you close it, which defeats the entire point of organizing in the first place. If your containers tend to shift when the drawer opens, a quick fix like anti-slip padding under each bin keeps the whole layout from sliding into a jumble again.
We’ve looked at plenty of cable storage advice over the years, and the pattern is consistent: containers matter far less than whether the cord itself is locked into a closed loop. A bin, bag, or bamboo divider can only do so much if the coil inside it is loose enough to unravel.
That’s why we lean on binder clips and Velcro straps first, then pair them with a sustainable organizer for readers who want a container that lasts longer than a plastic bin from a discount store. A little consistency, a quick scan every few months, matters more than any single product. Keep doing that, and the drawer stays tidy on its own.
— Cozee
If binder clips and freezer bags feel like a good short-term fix but you want something sturdier for the long haul, a bamboo drawer organizer offers compartments built to stay put. Unlike a plastic tray that shifts each time you open the drawer, a well-fitted divider keeps each bundle in its own slot so cords stop sliding into each other in the first place.

Cozee-bay builds these organizers from sustainable, handcrafted bamboo, with detailed product descriptions and real customer reviews so you know what you’re getting before it arrives. Every order ships free within the contiguous U.S., and it’s backed by a money-back guarantee if the fit or finish isn’t right for your drawer. Browse the full lineup of drawer organizers and measure your drawer against the listed dimensions before you order, that’s the one step that makes any organizer actually work.
Most standard drawers take 10 to 30 minutes, with the initial declutter and sort taking up most of that time.
Lock each cable into a closed loop with a binder clip or Velcro strap; the locked crossing point keeps ends from sliding into other bundles.
No. Freezer bags, binder clips, and cut cardboard tubes work well, though a bamboo divider from Cozee-bay offers a sturdier, longer-lasting option if you want a ready-made solution.
Do a quick scan every few months and a full purge once a year to remove obsolete or damaged cords before they pile up again.
Yes, but keep them in a separate compartment away from batteries or damp items, and avoid tight bends at the plug base to protect the wiring inside.
Comments will be approved before showing up.