Your Cart is Empty


Bamboo Headboard DIY: Build Yours for Under $60
TL;DR:
- A DIY bamboo headboard is an affordable and stylish project that enhances bedroom warmth and natural texture. Proper joinery, finishes, and humidity control ensure long-term durability and beauty. Bamboo’s unique characteristics make it a forgiving material, emphasizing natural imperfections and craftsmanship.
Whether you’ve spent hours scrolling through furniture sites only to find headboards that cost more than your mattress, or you’ve settled for a bare wall because nothing felt quite right, a bamboo headboard DIY project might be exactly what your bedroom needs. Bamboo is trending hard in 2026 as a major interior design choice, celebrated for its warmth, natural texture, and surprisingly affordable price tag. This guide walks you through materials, tools, building steps, finishing, and long-term care so you can build something genuinely beautiful without the guesswork.
Table of Contents
- Key takeaways
- What you need for a bamboo headboard DIY project
- How to build a bamboo headboard step by step
- Finishing techniques for your bamboo headboard
- Caring for your bamboo headboard long-term
- My honest take on bamboo headboard projects
- Take your bamboo bedroom further with Cozee-bay
- FAQ
Key takeaways
| Point | Details |
|---|---|
| Budget-friendly build | A bamboo headboard typically costs $35 to $60 and takes only a few hours of active work. |
| Joinery matters most | Mortise-and-tenon joints outperform screws and mechanical fasteners for long-term structural strength. |
| Finish smart, not heavy | Water-based polyurethane is the top recommended finish for bamboo. Heavy sealers trap moisture and cause damage. |
| Humidity control is key | Keeping indoor humidity between 40 and 60 percent extends your bamboo headboard’s lifespan significantly. |
| Sustainable and stylish | Bamboo headboards combine eco-friendly credentials with genuine warmth and craftsmanship that few materials match. |
What you need for a bamboo headboard DIY project
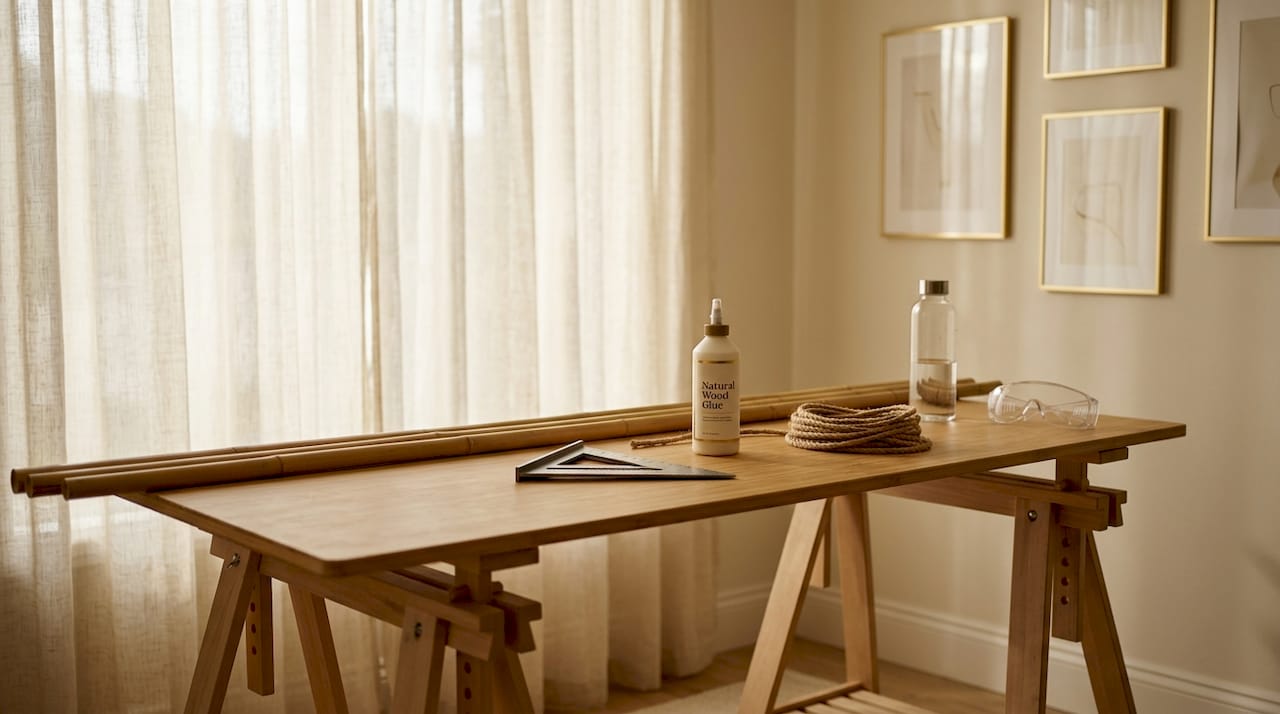
Getting your materials and tools sorted before you pick up a single piece of bamboo saves you at least one frustrating trip to the hardware store mid-project. Here’s exactly what you need.
Bamboo types to consider
Not all bamboo is equal for furniture projects. These are your three best options:
- Moso bamboo poles (1.5 to 2 inches in diameter): The most common choice, sturdy and widely available. Great for rustic bamboo headboard styles with visible poles and a tropical feel.
- Bamboo plywood panels: Laminated sheets made from compressed bamboo strips. Easier to cut, very consistent, and works perfectly for a clean, modern bamboo bed design.
- Bamboo trellis sheets: Pre-assembled woven or lattice panels. The fastest route to a finished look, ideal if you want a bohemian or coastal vibe with minimal cutting.
Tools and materials overview
| Material/Tool | Approximate Cost | Best For |
|---|---|---|
| Moso bamboo poles | $15 to $25 | Rustic, natural pole headboards |
| Bamboo plywood panel | $20 to $35 | Modern, flat panel headboard designs |
| Bamboo trellis sheet | $18 to $30 | Quick, woven or lattice-style headboards |
| Hacksaw or miter saw | Varies (often owned) | Cutting poles and panels cleanly |
| Brad nailer or staple gun | Varies | Securing bamboo to a frame |
| Sandpaper (120 and 220 grit) | $5 to $8 | Surface prep before finishing |
| Water-based polyurethane | $12 to $20 | Sealing and protecting the surface |
Other tools worth having on hand include a measuring tape, a carpenter’s square, wood glue, twine or natural rope for lashing poles, and safety glasses. A well-ventilated workspace is non-negotiable when sanding or sealing.
Pro Tip: Set up your workspace on a flat surface with two sawhorses so you can work at a comfortable height. Bamboo poles like to roll, so lay a non-slip mat underneath before making any cuts.
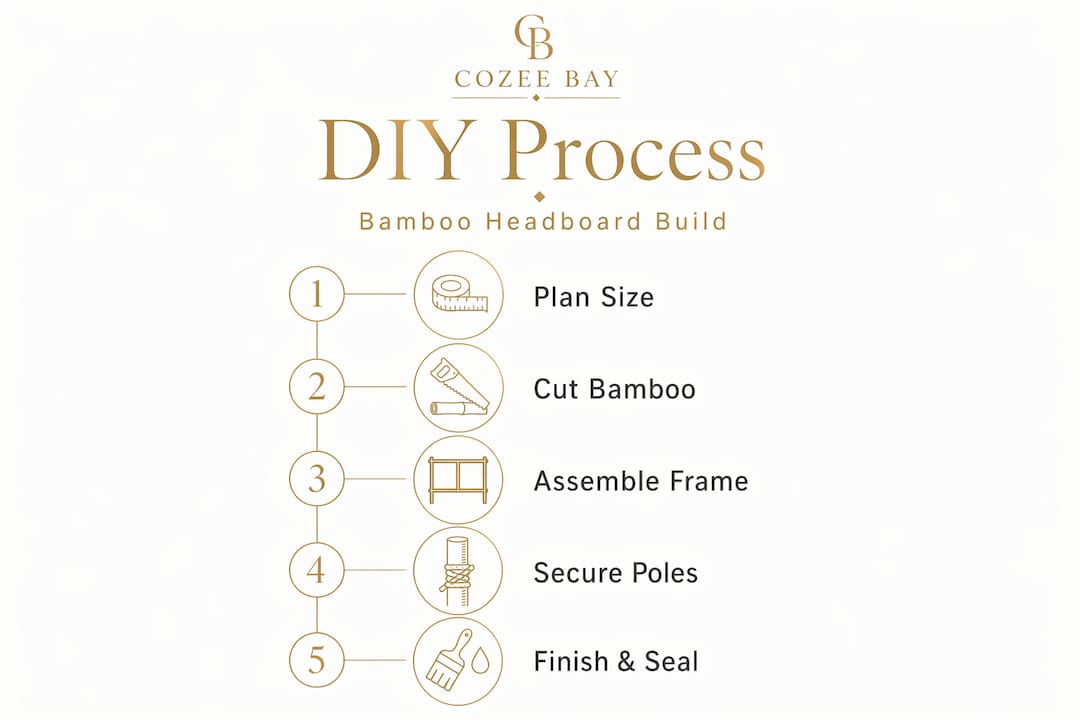
How to build a bamboo headboard step by step
This process works for a queen-size headboard but scales up or down easily. Budget roughly 2 to 3 hours of active build time plus overnight drying.
-
Measure your bed width and target headboard height. For a queen bed, you want a finished width of at least 60 inches and a height between 36 and 48 inches. Add 2 inches on each side for overhang. Sketch your design on paper before touching any bamboo.
-
Build or source your backing frame. Cut two vertical side rails and two horizontal crossbars from 1x4 pine or, if you want to keep the whole project eco-friendly, use bamboo plywood strips. The frame is what attaches to your bed or wall, so get it square and solid first.
-
Cut your bamboo to length. Use a hacksaw or miter saw and score a line around the pole with a utility knife first. This prevents the bamboo fibers from splitting as the blade passes through. Cut all pieces to the same height for a uniform look, or vary lengths intentionally for a more organic, layered appearance.
-
Attach bamboo to the frame. For bamboo plywood, use wood glue plus a brad nailer to secure it flush against the frame. For poles, apply a generous bead of wood glue along each contact point, press firmly, and lash every six to eight inches with natural twine or rattan cord for a traditional bamboo furniture look. For trellis sheets, staple the edges to the back of the frame every three to four inches.
-
Check joinery and structural points. Mortise-and-tenon joints outperform mechanical fasteners for bamboo furniture longevity. If you’re building a freestanding headboard with legs, cut mortise slots at connection points and glue the tenon inserts before assembly. This prevents the wobble that screwed joints develop over time.
-
Sand the entire surface. Start with 120 grit to smooth any rough cuts or raised fibers, then follow with 220 grit for a finish-ready surface. Wipe down with a slightly damp cloth and let it dry completely before sealing.
-
Mount or attach to your bed frame. Freestanding headboards need legs cut from the same bamboo or pine, positioned at least 12 inches in from each edge. Wall-mounted versions use two French cleats cut from 3/4-inch plywood, one attached to the back of the headboard and one to the wall.
Pro Tip: For beds wider than a full, add a center support leg or bracket behind the headboard. Proper bamboo headboard design recommends slats at least 0.75 inches thick and a center support for larger frames to keep the structure stable over years of daily use.
Finishing techniques for your bamboo headboard
Getting the finish right is the step most first-time builders rush, and it shows. A bad finish on bamboo does not just look rough. It can trap moisture and shorten the lifespan of your entire project.
Here is what you need to know before you open a single can:
- Skip oil-based finishes. They yellow over time on light bamboo and take significantly longer to dry between coats.
- Use water-based polyurethane. It dries fast, has low odor, and stays clear. Water-based polyurethane is the professional recommendation for bamboo specifically because it does not react poorly with bamboo’s dense, grass-like fibers.
- Do not over-apply. Heavy sealers can trap moisture inside bamboo’s cellular structure, causing swelling, cracking, and finish failure. Two thin coats beat one thick coat every time.
- Consider a two-component formula for durability. If you want a longer-lasting result, two-part water-based polyurethane chemically cures to form a hard, flexible, non-yellowing film. Products like Bona Traffic HD are commercially available and worth the extra cost for a headboard that sees daily handling.
Step-by-step sealing process
Sand to 220 grit and wipe clean. Apply the first coat of water-based polyurethane with a synthetic bristle brush in long, even strokes following the grain direction. Let dry for at least two hours. Lightly sand again with 220 grit, wipe off all dust, and apply the second coat. A third coat on high-contact edges adds extra protection.
One thing worth knowing: sealing bamboo improves surface resistance, but it does not waterproof it. Sealing bamboo improves surface resistance, yet moisture management through humidity control remains critical to prevent warping or mold growth underneath the finish.
Factory-applied finishes, which use UV-cured polyurethane and aluminum-oxide coatings, are technically superior to site-applied finishes. But a properly applied two-coat water-based finish at home gets you surprisingly close. The key word is patience.
Caring for your bamboo headboard long-term
You spent real time building this thing. A little consistent care keeps it looking great for years.
Daily and weekly habits
- Wipe down with a dry or very lightly dampened microfiber cloth. Never use soaking wet cloths on bamboo surfaces.
- Avoid silicone-based furniture sprays. They leave residue that builds up in bamboo’s natural texture over time.
- Keep direct sunlight exposure minimal. Extended UV exposure fades bamboo’s natural color and dries out the surface.
Seasonal care
- Maintain indoor humidity between 40 and 60 percent year-round. This single habit does more for bamboo longevity than any product you can buy.
- In dry winter months, use a humidifier in your bedroom if your home drops below 35 percent relative humidity. Bamboo will shrink, crack, and loosen joints when it gets too dry.
- Once a year, inspect all lashed joints and glued connections. Tighten any loose twine and reapply a small amount of wood glue to any joints that have developed movement.
Cleaning products that work
Mild dish soap diluted in warm water handles most marks. For stubborn spots, a small amount of white vinegar diluted in water works well and does not strip the finish. Check out Cozee-bay’s bamboo care tips for a deeper look at product-safe cleaning methods that protect the finish you worked hard to apply. For a structured maintenance routine, the bamboo care steps guide walks you through seasonal and daily schedules side by side.
My honest take on bamboo headboard projects
I’ve seen a lot of DIY headboard builds over the years, and the bamboo ones consistently surprise people. Not because they’re easy. Because they’re more forgiving than expected once you understand how bamboo actually behaves.
The biggest misconception I encounter is that bamboo is just like wood. It is not. Bamboo is a grass with a cellular structure that responds differently to finishes, moisture, and mechanical stress. People who treat it like pine end up with cracked joints and peeling finishes within a year. People who respect its quirks end up with a headboard that gets more beautiful with age.
The joinery mistake trips up the most builders. Screws work fine temporarily, but mortise-and-tenon or lashed connections with proper adhesive are what make a bamboo piece feel like furniture rather than a craft project. That investment of an extra 20 minutes during assembly pays off for years.
What I genuinely love about these builds is the imperfection. The slight variation in pole diameter, the texture of natural twine at the joints, the way the grain shifts in bamboo plywood. That character is exactly what interior designers are pointing to when they talk about bamboo bringing warmth and craftsmanship to modern bedrooms. You cannot buy that feeling off a shelf.
My advice: do not over-engineer the finish, do not rush the drying, and do not apologize for the handmade details. They’re the whole point.
— Cozee
Take your bamboo bedroom further with Cozee-bay

Building a bamboo headboard is one of the most satisfying weekend projects you can take on, and it does not have to stop there. At Cozee-bay, we’re obsessed with helping eco-conscious homeowners get more out of every bamboo piece in their home. From care guides that show you exactly how to protect your finish season after season, to bamboo bedroom design ideas that help you build a cohesive, sustainable space around your new headboard, we’ve got the resources to take your project from good to genuinely great. Browse our full collection of eco-friendly bamboo products at Cozee-bay and find everything you need to complete and care for your bamboo bedroom.
FAQ
How much does a bamboo headboard DIY project cost?
Most bamboo headboard DIY builds come in between $35 and $60 in materials, depending on the bamboo type and finish you choose. Bamboo plywood and trellis panels tend to cost slightly more than raw poles but reduce build time significantly.
What is the best finish for a DIY bamboo headboard?
Water-based polyurethane is the top recommended finish for bamboo because it dries fast, stays clear, and does not yellow over time. Apply two thin coats rather than one heavy coat to avoid trapping moisture in the bamboo fibers.
How do you attach a bamboo headboard to a bed frame?
You can mount a bamboo headboard by attaching legs directly to the back frame and sliding them between the mattress and box spring, or by using wall-mounted French cleats. Freestanding designs with legs are easier to reposition and work with most standard bed frames.
Can a bamboo headboard work in humid climates?
Yes, but humidity management is critical. Keep your indoor environment between 40 and 60 percent relative humidity and make sure your headboard is properly sealed with water-based polyurethane. Bamboo sealed correctly handles humidity variation well, but prolonged exposure above 70 percent can cause warping over time.
What bamboo type is easiest for beginners?
Bamboo trellis sheets are the most beginner-friendly option because they arrive pre-woven and only need to be stapled or tied to a backing frame. Bamboo plywood panels come in a close second since they cut and handle much like standard plywood.
Recommended
Leave a comment
Comments will be approved before showing up.